GeoServer is a great FOSS (Free and Open Source Software) that provides powerful mapping capabilities. You can run it locally on your Windows computer, or on your own VPS (Virtual Private Server) in the cloud.
In this article, I will guide you through setting up GeoServer on a Linux host to serve a WMS (Web Mapping Service), WFS (Web Feature Service), and more.
Overview
Serving GeoServer is quite complex. To appreciate it, it is helpful to have an overview of the components and their relationships. Below is an illustration of the building blocks that make up this installation.
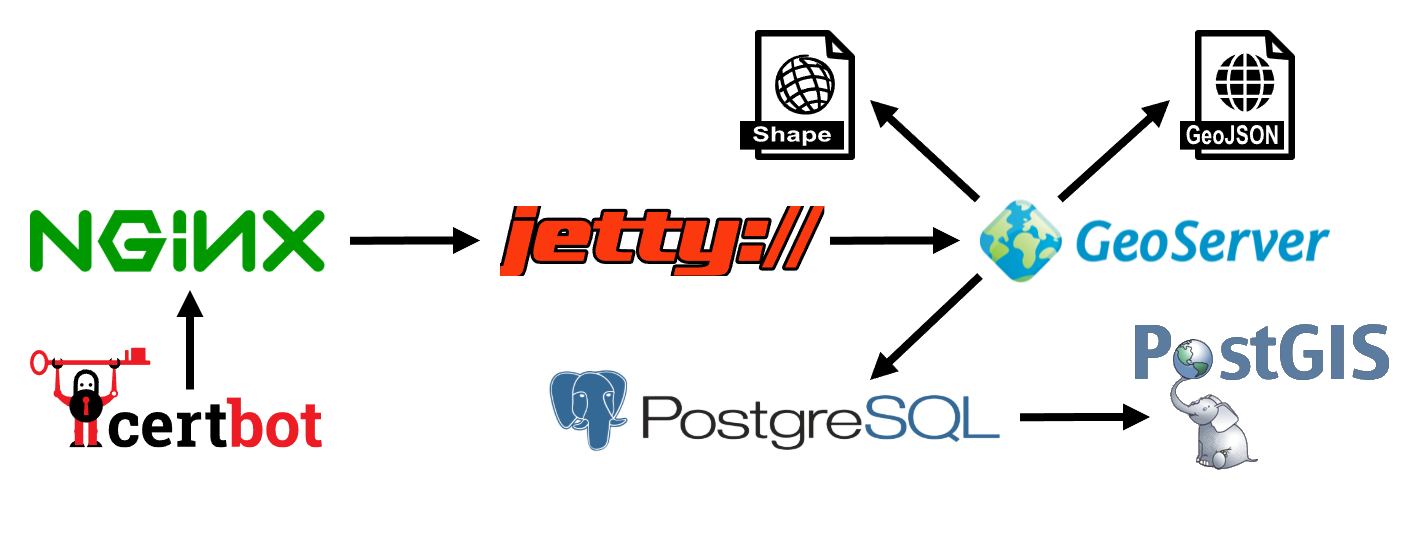
GeoServer is a Java web "applet" that is served by the web server Jetty. To make the web app available on a host that already serves other web applications and to simplify TLS management using Certbot, we will use Nginx as a reverse proxy. GeoServer can serve WMS, WFS, and other services based on various data sources. One of the most efficient ways to store and serve spatial data is to use PostGIS, a spatial data extension for PostgreSQL.
All of these building blocks are great FOSS that can be used in production-ready applications at no cost.
GeoServer Installation
GeoServer is a Java applet. To run it, you need a Java Runtime Environment. The GeoServer version used in this article runs on Java 17 or 21. In this guide, we will use Java 21, as it's the latest version.
sudo apt update
sudo apt install openjdk-21-jre
Then download the latest stable release and unzip it into the /usr/share directory.
wget -O geoserver-2.28.1-bin.zip "https://downloads.sourceforge.net/project/geoserver/GeoServer/2.28.1/geoserver-2.28.1-bin.zip"
sudo unzip ./geoserver-2.28.1-bin.zip -d /usr/share/geoserver
That's how easy it is to install GeoServer!
Once installed, you can run it manually in your terminal or as a daemon in the background. By running it as a daemon on a server, you can proxy it through Nginx to make it available on the internet.
GeoServer Setup
Making GeoServer production-ready
If you want GeoServer to be accessible on the internet, you need to take a few steps to secure/harden the installation. First, create a system user for GeoServer. This user will only be used to run GeoServer, and nothing else.
sudo useradd -r geoserverThis will create a system account that is locked from login and without a home directory.
Next, make the geoserver user the owner of the geoserver files.
sudo chown -R geoserver:geoserver /usr/share/geoserverNow you must check what ports are already being used by other services on your server.
sudo netstat -ntlp
Active Internet connections (only servers)
Proto Recv-Q Send-Q Local Address           Foreign Address         State       PID/Program name
tcp        0      0 127.0.0.53:53           0.0.0.0:*               LISTEN      xxx/systemd-resolve
tcp        0      0 0.0.0.0:22              0.0.0.0:*               LISTEN      xxx/sshd: /usr/sbin
tcp        0      0 0.0.0.0:443             0.0.0.0:*               LISTEN      xxx/nginx: maste
tcp        0      0 127.0.0.1:3306          0.0.0.0:*               LISTEN      xxx/mysqld
tcp        0      0 0.0.0.0:80              0.0.0.0:*               LISTEN      xxx/nginx: maste
From the output above, we can see that the default GeoServer port, 8080, is not in use by any other service on this server. If port 8080 is in use by another service, you can simply use any other available port.
Now you can set up a daemon to start and stop GeoServer. I prefer to use "supervisor" for my daemons. I find the configuration files easier to understand than the systemctl configuration files.
Make sure that "supervisor" is installed before continuing.
sudo apt update
sudo apt install supervisor
Once installed, the config file can be created.
sudo vim /etc/supervisor/conf.d/geoserver.haxor.no.conf[program:geoserver_haxor]
user=geoserver
directory=/usr/share/geoserver/bin
command=sh startup.sh
autostart=true
autorestart=true
environment=GEOSERVER_HOME=/usr/share/geoserver,JETTY_OPTS='jetty.http.port=8080'The config file above configures Supervisor to run GeoServer as the geoserver system user, to start it at OS boot automatically, and to restart it if it crashes. If you need to change the port on which GeoServer listens, set the "jetty.http.port" property to a different port number.
By running Geoserver as its own user and having that user own all the GeoServer files, we isolate the process and files, making it harder for a cybercriminal to harm other parts of the system if they exploit a GeoServer vulnerability and try to run commands on the server.
To start the daemon, run this command:
sudo supervisorctl updateIf you get no errors, GeoServer has been started and is available at the port you defined in the config file.
Now you can control the daemon using the following commands:
sudo supervisorctl start geoserver_haxor
sudo supervisorctl stop geoserver_haxor
sudo supervisorctl restart geoserver_haxor
sudo supervisorctl status geoserver_haxor
Important! Before you open the firewall or make GeoServer accessible on the internet from your server, you absolutely MUST harden your GeoServer installation.
The default GeoServer configuration is not production-ready, and unsafe!
To access GeoServer running on a server without exposing it to the internet, you can use an SSH port forwarding tunnel. Set it up in a terminal/command prompt like this:
ssh -N -L localhost:8080:localhost:8080 stanley@haxor.noPress Ctrl+c to close the tunnel.
This will make it possible to access GeoServer running on the remote host by using a web browser and navigating to http://localhost:8080/geoserver on your own computer.
Learn more about SSH Tunnels
To learn more about SSH tunnels and how to use them in different scenarios, read this article.
On the webpage, you can log in with the default credentials
Username: admin
Password: geoserver
Change the admin password by navigating to
- "Users, Groups, and Roles" from the left-side menu
- "User/Groups" tab at the top of the page
- Click on the admin user
- Enter a new password in both fields
- Click on the "Save" button at the bottom of the page.
Change the keystore password by navigating to
- The frontpage (click on the GeoServer header logo)
- Click the "Change it" link on the warning about the keystore default password.
- Use geoserver as the current password, and enter a long, safe password in both fields below.
- Click on the "Change Password" button.
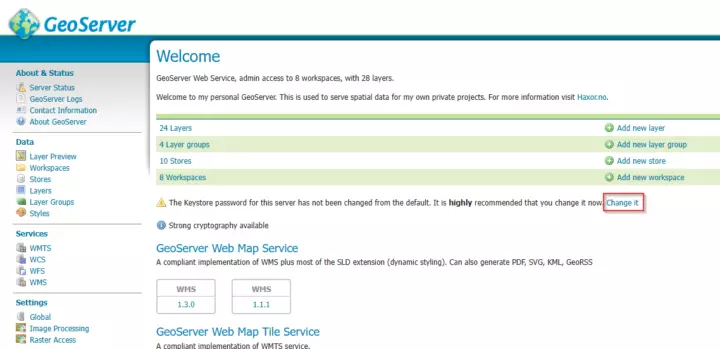
GeoServer frontpage with keystore warning
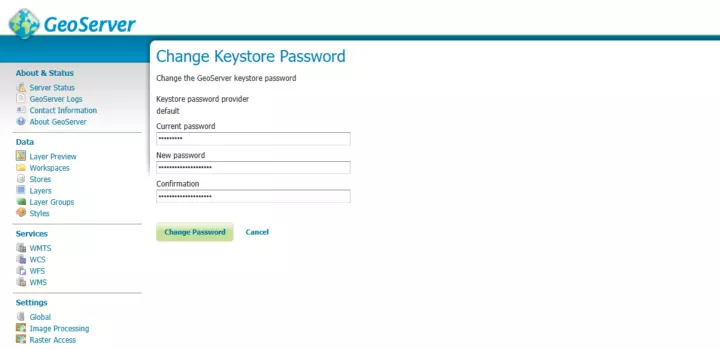
Setting new keystore password
Strengthen password-based encryption by navigating to
- Security -> Settings in the left-side menu
- Change Password encryption to "Strong PBE".
- Click the "Save" button
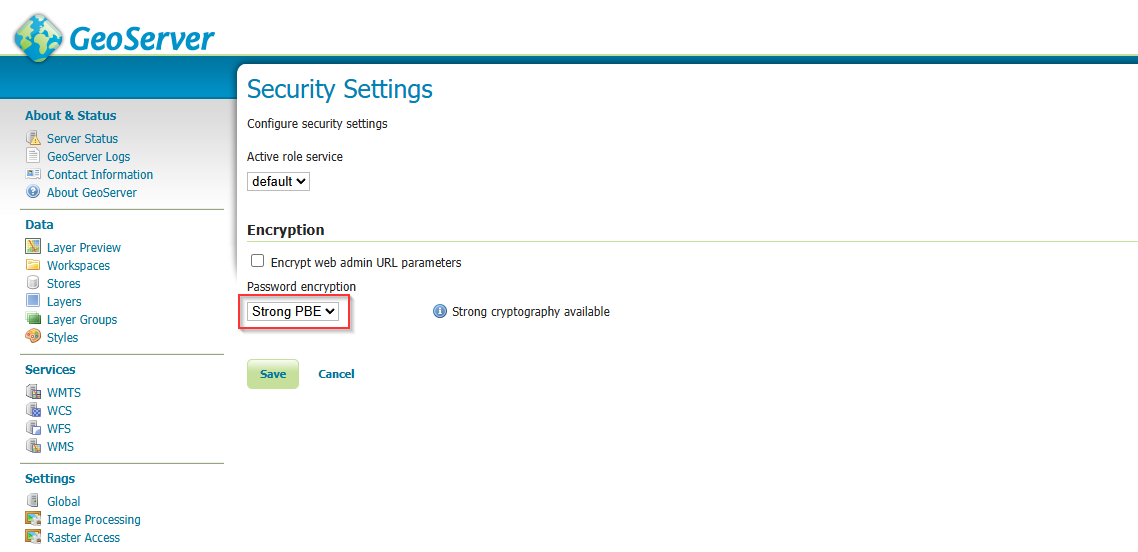
Using strong password-based encryption
By doing this, you have performed basic hardening of the GeoServer installation.

Nginx Reverse Proxy
To serve GeoServer on the web on a VPS hosting several other projects and services, Nginx can be used as a reverse proxy. The reverse proxy will simply route traffic from port 443 (HTTPS) to GeoServer running on port 8080 behind your firewall.
This process has these steps:
- Configure GeoServer.
- Configure CRSF.
- Set up your DNS.
- Configure the Nginx reverse proxy.
- Set up TLS on Nginx
Configure GeoServer:
Before setting up the Nginx reverse proxy, you must configure GeoServer to function behind it.
- Start an SSH port-forwarding tunnel, and use a browser to navigate to your GeoServer installation.
- Click on "Global settings" in the menu on the left side of the page.
- Fill in"Proxy Base URL" with "https://maps.haxor.no/geoserver".
- Enable "Use headers for Proxy URL" by checking the checkbox.
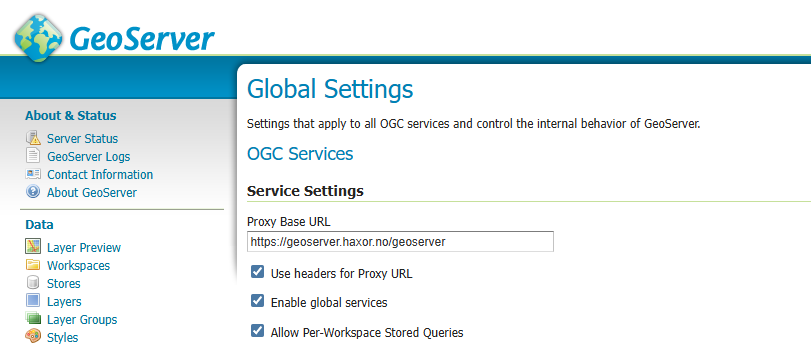
Unfortunately, I was unable to run the reverse proxy without the /geoserver path in the base URL due to the Jetty configuration. The only way I was able to make the reverse proxy work was to include /geoserver in the Base URL, and the reverse proxy route.
Configure CRSF to work with the reverse proxy
To allow the GeoServer admin pages to operate properly behind the reverse proxy, you must whitelist the reverse proxy hostname in the CSRF config.
If you don't do this, you will not be able to perform most actions in GeoServer. If you review the response in Chrome DevTools or equivalent, you will see an HTTP 400 error with the message "Origin does not correspond to request", indicating a CSRF error.
I spent an entire evening researching how to fix this because of incorrect documentation.
Open the GeoServer webapp config file and insert the following block anywhere inside the web-app tag to whitelist your reverse proxy host.
sudo vim /usr/share/geoserver/webapps/geoserver/WEB-INF/web.xml<?xml version="1.0" encoding="UTF-8"?>
<web-app
xmlns="http://xmlns.jcp.org/xml/ns/javaee"
xmlns:xsi="http://www.w3.org/2001/XMLSchema-instance"
xsi:schemaLocation="http://xmlns.jcp.org/xml/ns/javaee http://xmlns.jcp.org/xml/ns/javaee/web-app_3_1.xsd"
metadata-complete="false"
version="3.1">
<display-name>GeoServer</display-name>
<!-- INSERT THIS !! -->
<context-param>
<param-name>GEOSERVER_CSRF_WHITELIST</param-name>
<param-value>geoserver.haxor.no</param-value>
</context-param>
<!-- INSERT THIS !! -->Apply the changes by restarting the GeoServer Daemon.
sudo supervisorctl restart geoserver_haxor
Set up your DNS.
Configure the hostname/subdomain to have an A record or CNAME that points to your VPS running GeoServer.
Configure the Nginx reverse proxy.
Now, you can create an Nginx host file for the reverse proxy.
sudo vim /etc/nginx/sites-available/geoserver.haxor.no.confserver {
server_name geoserver.haxor.no;
listen 80;
location / {
return 301 /geoserver/;
}
location /geoserver/ {
proxy_pass http://127.0.0.1:8080/geoserver/;
proxy_set_header X-Forwarded-Proto $scheme;
proxy_set_header X-Forwarded-Host $host;
proxy_set_header X-Forwarded-Port 443;
# CORS setup to allow API access from other hosts
# Validate against allowed origins
if ($http_origin ~* (https://www\.haxor\.no(\.ddev\.site)?)) {
set $cors_origin $http_origin;
}
add_header Access-Control-Allow-Origin $cors_origin always;
add_header Access-Control-Allow-Methods "GET, POST, OPTIONS, HEAD" always;
add_header Access-Control-Allow-Headers "DNT,User-Agent,X-Requested-With,If-Modified-Since,Cache-Control,Content-Type,Range,Authorization" always;
add_header 'Vary' 'Origin' always;
}
}The CORS (Cross-Origin Resource Sharing) setup allows for specific websites to access all services provided by GeoServer.
This is not necessary if you just need a WMS (Web Map Service), since it only returns image files that are used by frontend applications like Leaflet and OpenLayers as map tiles. However, if you want to use resources such as WFS (Web Feature Service), you must add them. Otherwise, you will get a CORS error and will not be able to access the services.
The regular expression on line 17 allows for CORS in both my prod and dev environments, where I use DDev.
To make the reverse proxy available, you must create a symlink from the sites-enabled directory to the newly created host file.
sudo ln -s /etc/nginx/sites-available/geoserver.haxor.no.conf /etc/nginx/sites-enabled/geoserver.haxor.no.confCheck for syntax errors in your config by running this command:
sudo nginx -t
nginx: the configuration file /etc/nginx/nginx.conf syntax is ok
nginx: configuration file /etc/nginx/nginx.conf test is successful
Finally, to make the reverse proxy operational, you need to restart nginx.
sudo systemctl restart nginxTest the reverse proxy by navigating to its URL in a web browser. In this example, go to http://geoserver.haxor.no/geoserver.
Set up TLS on Nginx
If you can successfully reach GeoServer via your reverse proxy, you can complete the setup by configuring TLS with certbot.
sudo certbot --nginx -d geoserver.haxor.noWhen prompted, choose 2, to make Certbot configure your reverse proxy to redirect from HTTP to HTTPS. Test the TLS setup by navigating to https://geoserver.haxor.no/geoserver in a web browser.
To get an overview of the capabilities of the WMS, navigate to https://geoserver.haxor.no/geoserver/wms?request=GetCapabilities

PostGIS Installation
Database used for spatial data
PostGIS is a popular spatial data extension for the PostgreSQL RDBMS (relational database management system). To install it run the following commands:
sudo apt update
sudo apt install postgresql postgis

# OPTIONAL: PostGIS routing capabilities
# Search for available pgrouting version, and install the found version
sudo apt search pgrouting
sudo apt install postgresql-12-pgrouting

# Install a tool to import OpenStreetMap data into the pgrouting extension
sudo apt install osm2pgrouting
To verify that PostgreSQL is running, run this command:
pg_lsclusters
Ver Cluster Port Status Owner    Data directory              Log file
12  main    5432 online postgres /var/lib/postgresql/12/main /var/log/postgresql/postgresql-12-main.log
PostGIS Setup
To enable PostGIS, and make the database available from QGIS and GeoServer, you must do the following.
- Connect to PostgreSQL,
- Create a Role (Used to access PostgreSQL / PostGIS)
- Create a database.
- Connect to the database.
- Enable the extension(s).
- Create a new schema for uploading and reading spatial data.
Connect to PostgreSQL by running this command:
sudo -u postgres psqlRun these commands, one line at a time, by replacing the strings in <brackets>
CREATE ROLE <user_name> WITH LOGIN PASSWORD '<secret_password>';
CREATE DATABASE <database_name> WITH OWNER = <user_name>;

-- Connect to the new DB
\connect <database_name>;

-- Enable PostGIS extension on the DB
CREATE EXTENSION postgis;

-- Verify installation
SELECT postgis_full_version();
-- Press 'q' on your keyboard to exit.

-- Create a schema that will be used to store all the spatial data.
CREATE SCHEMA <schema_name> AUTHORIZATION <user_name>;

-- Exit from PostgreSQL
exit;
Optional: To enable all the most popular PostGIS features, enable these extensions as well.
-- Connect to the new DB
\connect <database_name>;

-- Advanded 3D support
CREATE EXTENSION postgis_sfcgal;

-- Raster support
CREATE EXTENSION postgis_raster;

-- Maintain connected lines when editing vector data
CREATE EXTENSION postgis_topology;

-- Routing capabilities
CREATE EXTENSION pgrouting;

-- Verify installation
SELECT postgis_full_version();
-- Press 'q' on your keyboard to exit.

-- Exit from PostgreSQL
exit;
Now the PostGIS setup is complete, and you can start adding data to PostGIS using QGIS.
PostGIS as a store
Connecting GeoServer to your PostGIS database is really simple.
- Navigate to "Data" --> "Stores" on the left-side menu
- Click on "Add new Store".
- Click on "PostGIS".
- Fill out the form.
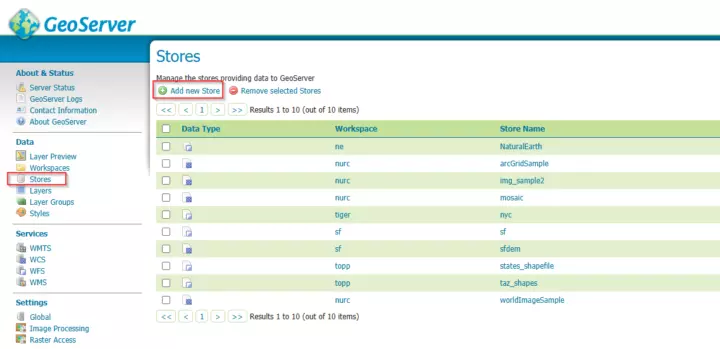
The Stores page
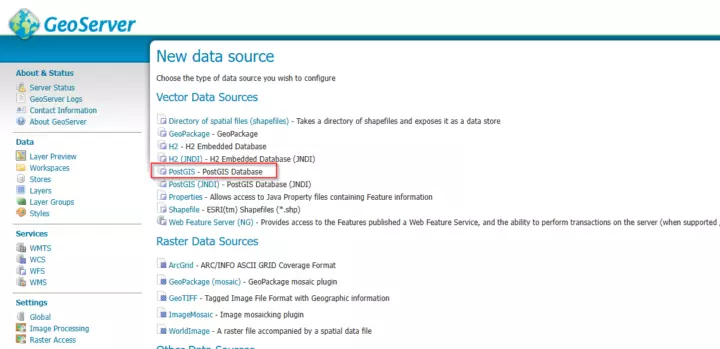
Adding a new data source
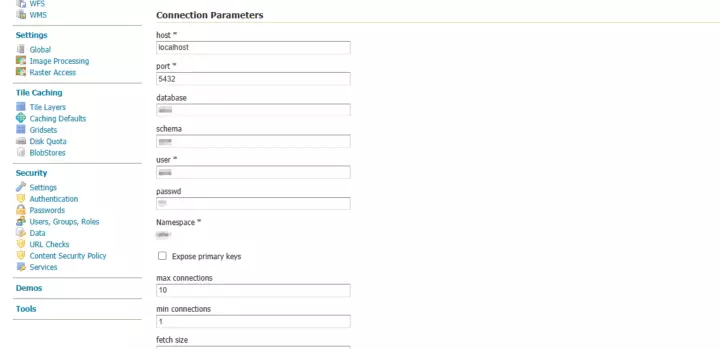
Fill out connection details
Once connected, you can use QGIS or other tools to upload spatial data to your PostGIS database and schema, and add that data as a layer in GeoServer. Uploaded layers will be automatically listed in the store.
Congratulations! You now have a fully functional GeoServer installation running 🎉